You may also want to review Ensoniq's reply from the November, 1989 Transoniq Hacker.
1997 Update:Be forewarned, the following conversion involves opening your Mirage, some minor understanding of electronics, and some soldering. If you, or someone you know well, does not feel comfortable with these concepts, this article is NOT for you. Opening your Mirage, and this conversion (although reversible) will likely void any warranty you have on your instrument. Although every effort has been made to supply accurate, exacting information, due to the fact that there are several models of Mirage available, the possibility of typographical error, or errors in comprehension by the reader, neither this web site nor the author can take any responsibility for damages or injury as the result of attempting the project outlined in this article.
Floppy drive technology has continued to march on since this article was written in 1989. Unfortunately, to the author's knowledge, the basic disk operating system for the Mirage remains "stuck" in it's original incarnation, using a single-sided 360K (formatted) 3.5" disk drive system. The following article explains how to replace the single-sided drive that came with most Mirage models with a more standard double-sided 720K (formatted) 3.5" drive. This conversion allows you to use standard double density double-sided disks as two single-sided storage media, with side "A" and side "B". The article explains this in more detail.In recent years, most computers systems have moved away from the 720K (formatted) double-density double-sided disk drive to a 1.44 megabyte (formatted) High Density (HD) double-sided type of floppy drive. These drives will NOT work in your Mirage with this conversion.
There are, however, many 720K double-density double-sided 3.5" disk drives sitting around in basements, garages, and probably, landfills, so they should be available inexpensively. Also, the HD disks used in the newer 1.44 megabyte HD disks offer no advantage (and perhaps some disadvantages) to the 720K formatted double-density disk. Although most stores no longer carry the 720K 3.5" disks, they too are available in the surplus and used marketplace for next to nothing.
Back in the early days of disk drives most of us had computers which used single sided 5.25" floppy disk drives. It didn't take long for people with these drives to figure out that if they punched an extra write-protect notch opposite the one the manufacturers put in the diskette jacket, that they could flip the diskette over and use the other side to store double the information on the diskette. This not only cut the cost of diskettes in half, but also made it possible to use half the space storing your diskettes, and halve the weight when sending diskettes in the mail.
Well, technology marched on, and soon the 3.5" floppy diskette format was developed. There were plenty of advantages to this format. The disk drive was considerably smaller and lighter, the diskettes were smaller, stored much more data, and were much less prone to damage due to their rigid plastic jacket and metal shutter. When the Mirage was first designed, Ensoniq was able to incorporate this relatively new smaller drive into it. Unfortunately, at that time double-sided versions of these drives were larger and much more expensive.
Although 3.5" floppy diskettes have come down somewhat in price over the years, they are still expensive and bulky to store, so it would be nice if the other side of the diskette could be taken advantage of. This would allow for six sound banks and 16 sequences to be stored on one diskette. The bad news however is that, unlike 5.25" diskettes, 3.5" floppies can't just be flipped over to take advantage of the other side. The only way to take advantage of the other side of a 3.5" diskette is to use a double-sided disk drive. The good news is that double-sided 3.5" disk drives are now as small or smaller than the single-sided versions of years ago, and can be purchased for under $90 new. The author acquired a used double-sided drive at a computer-fest for $35. Even better, some Mirage owners may actually already have double-sided disk drives in their Mirages. An informed source at Ensoniq told the author that toward the end of Mirage production the company could no longer get single-sided drives and therefore installed double-sided drives in the later production units (likely candidates are the Mirage DSK-1 models).
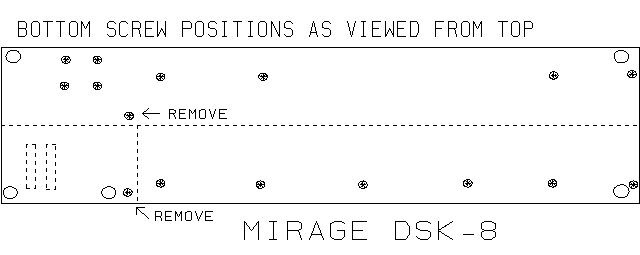
UNPLUG your Mirage from the wall socket. Unplug all MIDI, input, output, foot switch or other cables, and the line cord from the rear of the Mirage. Place the Mirage on a table long enough to accommodate it and about twice its width, as you will need this space when you open the cabinet. Firstly, using the Phillips head screwdriver you will need to remove two screws on the underside of the Mirage. Probably the easiest way to get at these screws is to slide the disk drive end of the Mirage off the table end just to the point where the keyboard starts, and work underneath the instrument, but one could turn the instrument over to access these screws. If you do slide the keyboard partially off the table be aware of the weight balance, or have an assistant hold the Mirage down, so it can't fall. FIGURE 1 shows the Mirage from the top, as if it was transparent. The screws and legs on the underside of the Mirage are marked. Take out the two screws marked "REMOVE". O.K. the awkward part is now over; slide the Mirage back onto the table.
|
|
|
|
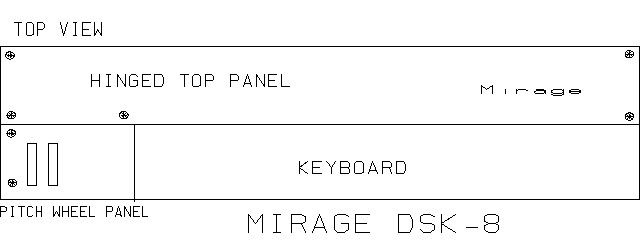
Next, using the 3/32nd inch hex key, remove each of the seven hexhead screws from the top of the Mirage (indicated as black dots in FIGURE 2).
|
|
|
You can now open the upper panel (the panel containing the volume slider and buttons). It is hinged in the back and just lifts from the front. However, the weight of the panel is enough to distort the hinge if the panel is left hanging, so it is best to either rest it on a wall or something a bit taller than the Mirage. You can now lift the panel containing the pitch and mod/mix wheels and disk drive out of the Mirage. If the unit does not easily come out, you have not removed the correct screws from under the Mirage. The disk drive is connected by both a wide ribbon cable and a set of four wires ending in a plug, but these should be long enough to allow you to turn the whole panel upside down (it might be a good idea to place this on something soft so nothing gets scratched). If you close the upper hinged panel, you can probably rest the panel containing the disk drive on the upper panel.
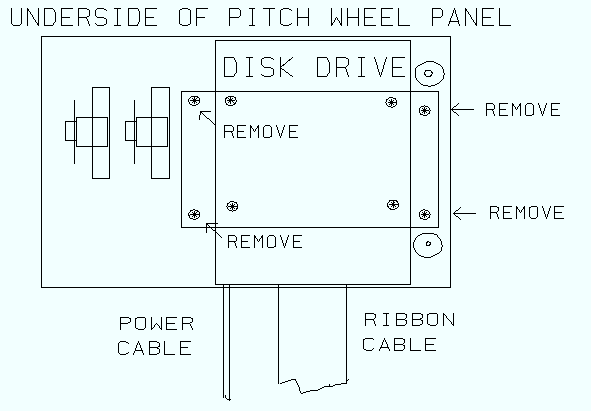
At this point you should be looking at the underside of the pitch and mod wheels and the underplate of the disk drive as in FIGURE 3. You will note on the DSK-8 there are four black Phillips head screws (with lock washers and metal spacer washers) on the perimeter of the black metal plate protecting the disk drive. There are also four more screws slightly inset from these. Remove the four outermost screws first, being careful not to lose the lock washers or metal spacers. The disk drive with its protective metal plate still attached can now be lifted off the mod/pitch panel. You can now flip the disk drive right side up, with the cables still connected.
|
|
|
Ensoniq used several different suppliers for the drives in the Mirage making them a little difficult to identify. However, there may be a sticker or other information somewhere on the drive or housing which may inform you if the drive is single or double-sided. The single-sided Matsushita drive the author found in his Mirage was a model JU-324. If you find a label stating "single-sided", .5 meg, or 400K, you know you have a single-sided drive. With the help of your local computer store you might be able to determine if the drive is single or double-sided from the model number. If you are unable to tell from the outside of the drive which type it is, you will need to open it up. To do this, have the disk drive right side up. Most disk drives have a thin aluminum housing on top, which doesn't allow you to see the inside of the drive. This housing is usually connected by a few small screws. Using an appropriate screwdriver, remove these screws (typically found on the top or sides of the drive) and carefully remove the metal housing, trying not to bend it. You should now be looking at the inside of the drive. Just about in the middle of the drive you will see a small plastic or metal arm or platform. Under this platform or arm will be another platform with a small ceramic (usually polished white) rectangle about 1/4" in width, with a black line running through it. This white ceramic rectangle is a disk drive read/write head. Single-sided drives have only one of these (which faces upward) while the other arm or platform above it will only have a piece of felt on it (facing downward) which is used as a pressure pad. If however, both the upper and lower arms or platforms have small white ceramic rectangular pieces, then the drive is double-sided.
Once you have determined if your Mirage has a single or double-sided drive you can decide how you wish to proceed. If you have a single-sided drive you will probably wish to put your Mirage back together until you acquire a double-sided drive to replace it. Before doing so carefully measure the disk drive. In general, the width and length of 3.5" drives are standard, but the heights do vary considerably. You do not want to purchase a double-sided drive which is taller than the one you currently have, since you will not be able to fit it in the space available. A shorter drive will fit with a small gap, which may work out well since you will need to install an accessible switch with the new drive to make it operate properly with the Mirage. Take a good look at the cable connections on the back of the drive, so you can recognize the 34 pin and four pin connectors when you go to purchase your double-sided drive. Although these are fairly standard, some drives come with PC board edge connectors instead of the 34 pin plug, and these will not work with the Mirage. The exact position and relationship between these two plugs on the back of the drive is not critical, since Ensoniq provided enough extra cable to accommodate most drives. Once you have made notes of size and plug types, you can temporarily put your Mirage back together. If you do put the screws back, be careful not to overtighten them, since several parts are plastic.
1997 Update:
This article was written in 1989 when standard IBM style 3.5" disk drives were 720K (formatted) double-density double-sided types. Today, the standard IBM drive is a 1.44 megabyte (formatted) High Density (HD) double-sided 3.5" drive. These drives will NOT work with the conversion discussed in this article.The way to distinguish between the newer 1.44 megabyte drive and the one discussed in this article (720K) is as follows:
When looking at the underside of the drive, with the front panel end (where the disk is inserted) toward you, there should only be one switch visible on the front right corner (this is the write protect switch) on a 720K drive. If the drive is a High Density 1.44 megabyte drive, it will have a switch on both front corners (one is the write protect, the other a sensor switch to detect 1.44 disks, which have an extra hole in them in the opposite corner of the write protect tab). You want the type of drive which has only one switch.
If you have determined your Mirage is fitted with a single-sided drive, you will need to locate a double-sided drive. What you are looking for is a standard one megabyte (often referred to as a 720K formatted) half-height internal double-sided 3.5" floppy disk drive, which is 1 and 1/4th inches or less tall (based on the Mirage DSK-8). You do NOT want an 800K Apple drive, such as the ones used for the Macintosh computer, as these use special variable speed motors. Most half-height internal 3.5" drives made for IBM computers will work as long as they have the right type of cable connectors on the back (see update notice above). Again, you do NOT want PC edge connectors. The only other requirement is that the drive either have an addressable device number (some drives have a movable jumper allowing you to change what device number the drive recognizes) or a drive which is defined as drive number 0 (zero). Almost all drives are either addressable or are factory set to drive 0. The author chose a Teac drive, which is only 1" tall, leaving a 1/4" gap between it and the Mirage cabinet. If you are ordering your drive by mail, Teac 3.5" half-height 720K (formatted) drives (Model # FD-135 FN-75 U or equivalent) are advertised for between $70-$90 by dozens of companies in the massive Computer Shopper magazine, a monthly publication available at most magazine stores for $2.95. When you order, indicate you need a drive with a face plate and a 34 pin connector on the back, NOT one with a PC board edge connector. You do not need a drive "kit" or special mounting brackets to fit the drive into the space of a 5.25" drive (these accessories cost extra). Although there are several other companies manufacturing drives that will work with the Mirage, the instructions given in this article as based upon the Teac model mentioned above. The wiring diagrams provided should work with any standard drive, however, some drives have unusual jumpers which need to be moved or removed, and you may need to experiment to get the drive to operate properly.
O.K. now that you are sure the drive will fit, you will need to make some minor modifications to it so it will work with the Mirage (this includes any double-sided drive you might have found in your Mirage). Normally, instruments that use a double-sided drive have a software operating system that acknowledges the drive can write on both sides of the disk, and the software keeps track of what is being written on each side. Unfortunately, to the author's knowledge, no one has ever rewritten the Mirage OS to acknowledge a double-sided disk drive, and this author doesn't know enough about programming the Mirage to make the change in the OS. Therefore, the Mirage must be prodded via hardware. What this modification does is install a switch which allows the you to switch between the two sides of the drive.
There are several different ways of installing the switch needed. The simplest method is to install just a switch, and instructions are provided for this approach for those who have no understanding of electronics. However, it should be noted that with this method the user will have no indicator (other than the switch position) as to which side is being read or stored to. Unless the user has a very good memory, or ALWAYS checks the position of the switch before storing new information on the disk, one might have the very unpleasant surprise of writing over previously stored sound banks or sequences.
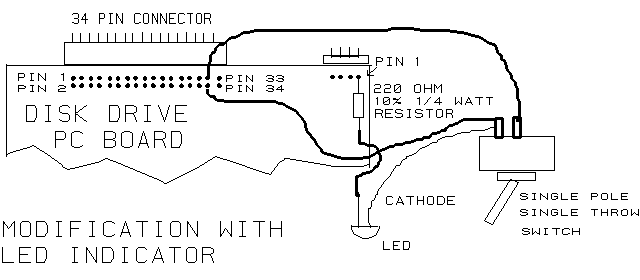
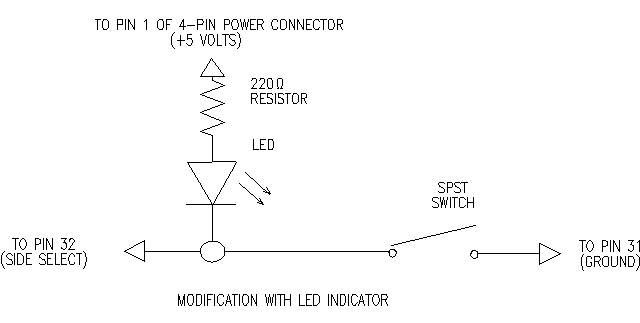
A better modification involves one more wire, a resistor, and an LED (a little light). When wired as suggested in this article, the LED will go on whenever the switch is positioned for the second side of the disk.
|
|
|
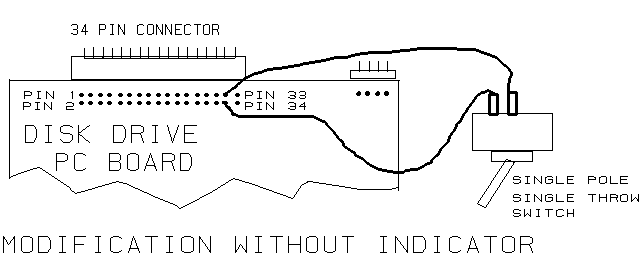
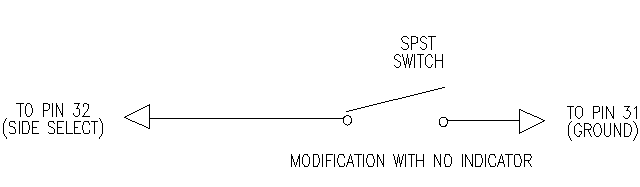
Pins 1, 2, 33, and 34 (and perhaps others) should be indicated on the printed circuit board. Locate pins 31 and 32, which are the ones next to the last pins in the group. Solder one wire to the PC board at pin 31, and the other wire to the PC board at pin 32. Be careful not to bridge the two pins with excess solder as this will short them, and only allow the drive to access side two of the diskette. Solder the other end of each wire to one terminal of the switch. Refer to FIGURE 5 for the schematic for this modification. (You may now skip to section on installing the drive.)
|
|
|
|
|
|
|
|
|
If you put your Mirage back together while waiting for your double-sided drive, you will need to take it apart again, and remove the single-sided disk drive. When you have the disk drive removed from the mod/pitch lever panel, it will still be connected with the ribbon cable and four wire power cable. Since the ribbon cable can be connected in two ways, mark it and the power cable plug to indicate the top side (a piece of masking tape will do). Turning the disk drive back upside down, carefully remove the four wire power cable plug. You may find it necessary to use a small screwdriver or your fingernail between the plug mount on the disk drive and the plug to prod it off. The ribbon cable plug might be a bit trickier to remove. The plug that connects the ribbon cable to the disk drive will probably be quite snug since it is a 34 pin plug. Also, it is often difficult to see the separation point between the disk drive plug and the ribbon cable plug. With good lighting look closely at the connection. You should see a small line running the length of the connection. With a small thin screwdriver try to create a gap between the two plugs at one end. If you still cannot see the break, try grasping the plug (NOT the ribbon cable itself, as it is rather fragile) on each side and gently wiggle it from side to side while pulling away from the back of the disk drive to try to loosen it a bit. The plug you are removing is female (the pins will stay with the drive). Once the drive is separated from the Mirage, remove the four screws holding the mount plate to the disk drive, and put your single-sided drive somewhere safe. Transfer the plate over to the double-sided drive. If the drive you purchased is missing the mounting brackets to allow you to attach the metal plate, you will also need to transfer them from the single-sided drive you removed.
Before attaching the ribbon cable to the new drive, take note that one edge of the cable has a colored stripe going down it. This is the side that needs to connect to pin 1 side of the 34 pin plug on the disk drive. Usually this will leave the ribbon cable the same way as it came off the single-sided drive, however some drives flip the plugs upside down, in which case the ribbon cable will need to be flipped over. The four wire power cable plug should only go on one way comfortably.
Once you believe the cables are correctly connected, you may wish to test your Mirage before putting it completely back together. Mount the disk drive onto the pitch/mod wheel panel. Plug in your Mirage, and turn it on. Keep your fingers out of the innards of the Mirage once it is plugged in; some points are at 110 volts A.C. Take a Mirage boot disk (one with the OS on it) making sure it is write protected, and put the disk in the drive. If the Mirage acknowledge a unformatted disk in the drive (indicates "ud" flashing on the readout) try flicking the installed switch to the other side. This should allow the Mirage to boot. If your Mirage doesn't even acknowledge the drive (the readout shows two lines) or doesn't acknowledge the disk (flashes "nd" even when a diskette is installed in the drive, you will need to move some jumpers (more about this later).
Once your Mirage has booted, if you have installed the modification with the LED, flick the switch to the other side, and the LED should go on, indicating the second side. If the LED stays on no matter which way the switch is placed, you have likely reversed pin 31 and 32 on the 34 pin connector; reversing the wires going to these two pins should correct the problem. Keep in mind that even if the LED stays on, the switch IS working and you should be cautious about saving anything to the diskette until you are sure which side is which.
Once the drive and diskette are being acknowledge properly, boot up the Mirage with a formatting diskette, and format both sides of a blank diskette. You accomplish this by first formatting side one, then flicking the switch and formatting the second side. For this test I suggest using a brand name official double-sided diskette, just to make sure any problems that shows up aren't due to bad diskette medium. Try storing sound banks and sequences in each space of each side, and then retrieve them. Also try loading sound banks and sequences from older disks, (obviously only side one will have things on it). Lastly, try to format the second side of a disk you already have information on the first side. Once you have checked everything, you can put your Mirage back together, and figure out exactly how you wish to mount the switch and or LED.
You can now format the second side of all your disks, giving you double the space for sound banks and sequences. Just remember to watch that LED light or switch position before you save. Of the over 200 Sony single-sided diskettes in the authors collection, only two did not format properly on side two. This represents a pretty impressive saving of space and money, and leaves space for samples and sequences for the next year or two!!
1997 Update:
If you would like to get in touch with the author, he can be reached via e-mail at: ua107@freenet.victoria.bc.ca